Continuing on with fully notated drum parts, here are some plugins I’ve found really helpful in streamlining the process.
Duplicate Rests
A really helpful plugin for dealing with duplicate rests is Hide Duplicate Rests. You will need to download the Hide Duplicate Rests plugin and install it. (How to install plugins)
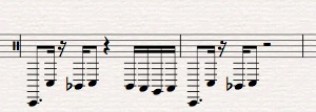
When notating in two voices you will often run into a situation like this:

Notice that you’ve got rests that you want to keep in each voice but there are 3 rests that if removed would really tidy up this drum part. You could just select the rests in one of the voices and use Edit>Hide. For one rest, this is an easy enough way to do it. But when you have a lot of rests and you want to hide them in one move, Hide Duplicate Rests will complete the task much faster.
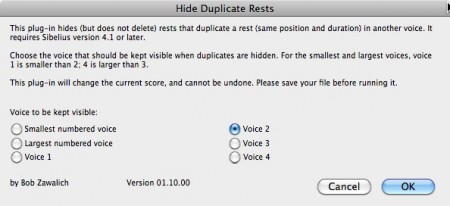
For the example above, select the measure and go to the Plug-ins menu and then to the folder where you put the Hide Duplicate Rests plugin and select it. The window for the plugin will come up. I use this setting for the plugin:

And in one move you end up with this:

Quick kick drum part
The way I usually work, the drum part is one of the last parts I create. Generally many of the aspects of a good drum part are dictated by the kind of groove being played by the bass and comping instruments. In many rock and funk grooves the kick drum is duplicating the rhythm played by the bass or at least outlining the accents of the line. A plugin that can make quick work of creating this type of kick drum part is a very versatile plugin called Make Pitches Constant, you’ll find it in the menu Plug-ins>Notes and Rests.
Here’s a sample bass line:

Now copy that bass line into the drum set staff.

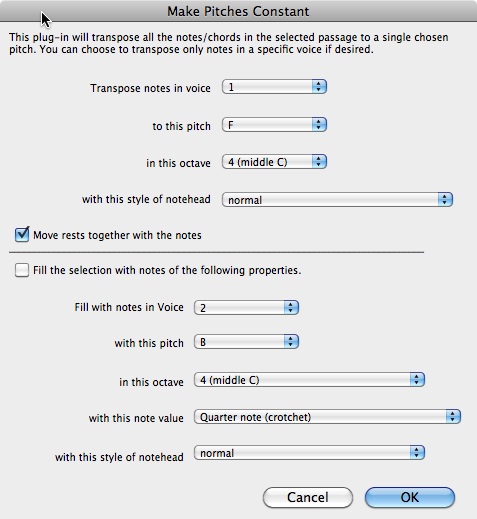
Select the bars in the drum set staff and go to Plug-ins>Notes and Rests>Make Pitches Constant and set the parameters of the plugin as I have below. You only have to worry about the parameters in the top half of the window. As I said earlier, this is a very versatile plugin and in later posts I’ll show you where that bottom half comes in handy. Click OK.

So now you have this.

Only one more step, this kick drum part is now in voice 1 and you and want to send it to voice 2. Easy fix, select the measures and go to Edit >Voice>Swap 1 and 2 (or you could use the keystroke shift V). Your kick drum part is now in voice 2.

You are ready to go into voice 1 and create the appropriate hi hat and snare parts. You already know how to do that don’t you? Both of these plugins are so useful I’ve created keyboard short cuts for them that really speed up the process.
In the next post we’ll look at some plugins and built in Sibelius 6 features that make quick work of repeat bars, slash notation and rhythmic notation.
Hinch
P.S. If you have any specific questions regarding drum set notation in Sibelius please leave a comment or drop me an email and I’ll make sure I cover it.
I’m pleased with this as it makes life easier, writing for drums is time consuming and it opened a way for me to score quicker and easier.
Many thanx,
Khaya.
hi there – is it just me !! can any one explain why when i type in the bing browser “johnhinchey.com” i get a different site yet whe i type it in google its ok? could this be a bug in my system or is any one else having same probs ?
sadensy
Hi, Thanks for reading my blog. I have no idea what the difference of search is with Bing and Google. I’m just glad you found it.
When I type in Bing, it brings me right to my site. Best regards, John
Good information. Lucky me I came across your blog by accident
(stumbleupon). I’ve book-marked it for later!