With this post I’ve cover the remaining drum set notation types sited in my first post in this series.
5. Combination notated and slashes

As you can see from this example above, sometimes you have bars that are fully notated for part of the bar and then go to slashes for some reason, in this case a fill. The way to do this is to notate the first part of the bar and then put in slashes, either by putting notes on the midline and changing the notehead or using Move Pitches To Transposed MIdline to create the slashes and then adding the final snare on beat 4. The snag is you end up with this:

You’ve got rests in voice 2 that really need to be hidden. You could select each rest and hide them individually but there is a faster way by using the plugin Hide Rests In Voice. You need to download and install the the plugin.
Select the part of the bars in which you need to hide rests. In this case beats 3 & 4 of the first bar and beats 1-3 of the second bar. Your selection should look like this:

Now go to the the Plug-ins menu and select Hide Rests In Voice wherever you installed it. This window will come up and for this example I’ll use the settings here.
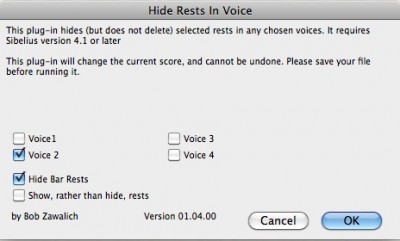
That’s it, you’ve hidden the rests in voice 2 and your bar should look like the first example in this post.
Another type of combination bar is one where a single element is notated and the rest of the elements are left up to the drummer. Example 1 below shows the rhythm the drummer should play on ride cymbal but everything else is up for interpretation. In example 2 there is a specific kick drum figure that needs to be played to sync up with a specific bass figure.
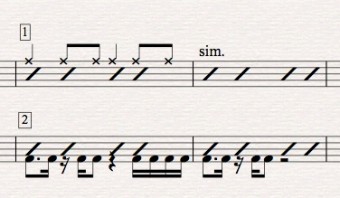
This type of notation is created by going into voice 1 and creating one notation element in the top part of the staff, then in voice 2 creating the bottom element. Simple enough to do but both of these examples can be quickly created with the Make Pitches Constant plugin.
For example 1, notate the ride cymbal rhythm in voice 1 of the drum staff and don’t worry about the noteheads, select the bar or bars you need (single blue box).

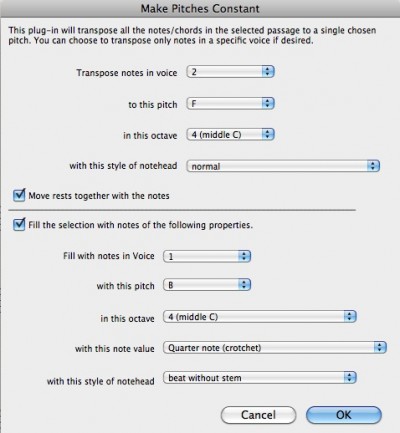
Now go to Plug-ins>Notes and Rests>Make Pitches Constant and set the parameters as follows. In the top panel you are indicating that you want the notes to be moved to the F line, in octave 5, voice 1 with an cross (x) notehead. In the bottom panel, the parameters are beats without stems (slashes), on the B, in octave 4, in voice 2.
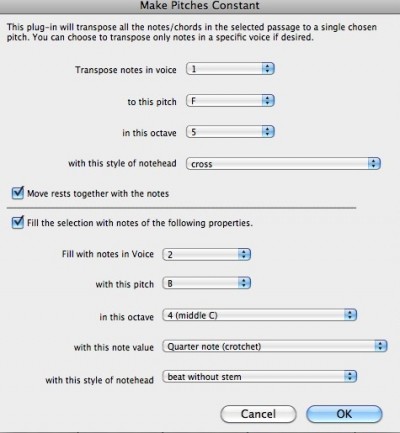
Now you should have what I’ve shown in example 1 above.
For example 2 we have the reverse we want the notation in voice 2 and the beats without stem (slashes) in voice 1. This is very similar to an example sited in my blog post Drum set notation part-3-fully notated bars. The easiest way to do this is to copy the bass line into the drum set staff, select the bar or bars (single blue box), move the notes to voice 2 using the Edit>Voice>Swap 1 & 2, or the keyboard shortcut of shift V.
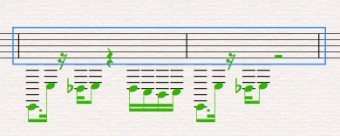
Now use these settings for the Make Pitches Constant plugin.
And now you should have the result shown above in example 2.
6. Cues for kicks

If you’ve been reading my previous posts you know that there is a plugin that makes very quick work of this type of notation. It is a modified version of Make Pitches Constant. Please see my post Sibelius Plug-in: Make Pitches Constant-Drums.
7. Cues for navigation

There are often situations where there is no conductor or perhaps the conductor is also playing piano or it is just more efficient to notate an instrumental or a vocal line into the drum set part to clarify the situation. In the example above, perhaps the vocalist takes great liberties with the timing of this phrase and your drummer really needs to know that the drums start time right after the word “is.” Sibelius makes this type of cueing pretty easy.
Let’s assume that you have the vocal part notated in a vocal staff on the score.
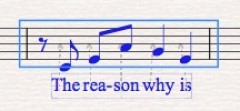
Select the vocal line you wish to use as a cue and then go to Edit>Copy or use the keystroke command C. Next click on the drum set staff where you want it to end up and go to the menu Edit>Paste As Cue or use the key stroke shown here.

Now Sibelius creates the cue sized notes for you with text indicating which staff the cue originated on.
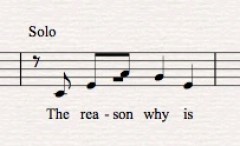
A few more tweaks I do, you can see in my example under this heading, I change the text to read “vocal cue” and I moved the whole measure rest up out of the staff. There are several parameters you can setup for the paste as cue command. You will find them under the menu Sibelius 6>Preferences>Paste As Cue.
If there is some aspect of drum set notation in Sibelius that I haven’t covered that you would like me to talk about, please leave a comment or drop me an email.
Hinch
Thanks for the hints, John! I just finished my first big band chart since I was in college many years ago, back in the pencil and paper era, and your tips on drum notation have been a great help, especially the ones for numbering repeated bars, and how to cue in brass hits. Thanks again!
My pleasure, thanks for reading the blog!
Hiya,
Do you have any idea how to hide the staff lines so you can just see the cue on the music using sibelius 6?
Thanks
Hi Charlotte, Thanks for reading my blog. Yes, go to the menu Create>Other>Instrument Change. In the family list scroll down to Others, then in the instrument list at the bottom you’ll see No instrument hidden, select that click ok. Now click on the staff where you want the staff lines to go away. This is the simplest way. I did a blog post on another way to do this here: http://johnhinchey.com/2010/07/10/sibelius-tutorial-chord-diagrams-with-no-staves/
Best,
John
JOHN! Thank you so much!! You are a sibelius GENIUS! You don’t even know how long I spent trying to work that out 🙂
Blush! Why thank you for the kind words! Glad I could help!